By self-hosting, Listmonk runs on a VPS you already pay for. The sending costs what your SMTP relay charges per thousand emails. The subscriber count does not change either number. That is the structural shift that makes self-hosting worth the setup time once you outgrow a managed free tier.
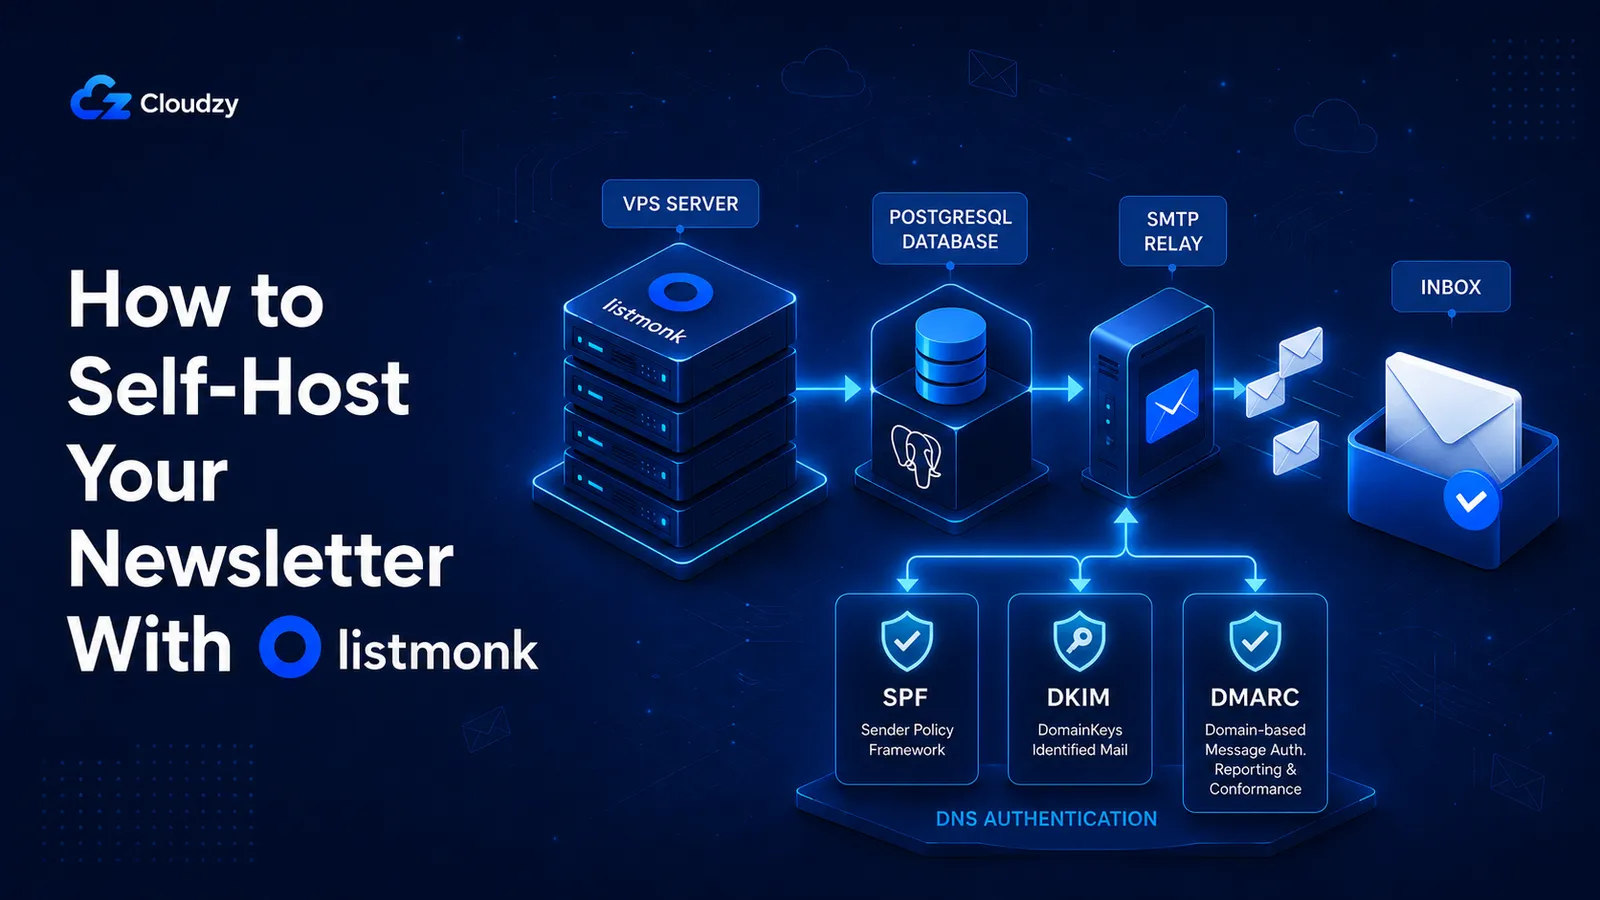
Listmonk is an open-source, Go-based newsletter manager. You get unlimited subscribers, lists, and campaigns for the cost of a VPS plus an SMTP relay account. One thing must be clear before you touch a command: Listmonk handles everything except the actual sending. Whether your email lands in the inbox or the spam folder is determined by the SMTP relay you configure and the DNS records you set on your sending domain.
What This Guide Covers
- Deploy Listmonk and PostgreSQL with Docker Compose behind an Nginx (or Caddy) reverse proxy with HTTPS
- Pick the right SMTP relay for your volume and budget (Amazon SES, Postmark, Brevo, or other)
- Configure SPF, DKIM, and DMARC on your sending domain
- Avoid four production failure modes that often do not surface clear errors
- Estimated time: 30 minutes if you have a VPS and a domain ready
- Out of scope: drip automation, transactional email, multi-instance setups (see FAQ)
When Listmonk Is the Wrong Tool
Listmonk is the right answer for a specific situation. If your situation is different, there is a better answer.
Volume below ~10K emails per month. Managed free tiers at Brevo or Mailchimp may cost less all-in than a VPS plus an SMTP relay at this scale. Self-hosting starts paying off once you cross that range. Check the numbers against your actual subscriber count and send frequency before deploying.
Non-technical team. Mailchimp and Brevo have genuinely better UIs for people who do not work in a terminal. Listmonk assumes someone on the team can SSH into a server, read Docker logs, and interpret DNS propagation. If that person does not exist, managed services are the correct choice.
Need automation workflows. Listmonk sends campaigns. It does not support drip sequences, behavior-triggered emails, or visual workflow builders. If you need those, run Mautic or wire Listmonk to n8n for the automation layer.
GDPR-sensitive subscriber lists. If your subscribers are primarily in the EU or your list is subject to GDPR data-residency rules, run Listmonk in a European datacenter. We offer Frankfurt and London locations that meet EU residency requirements.
What You Need Before You Start
Listmonk plus PostgreSQL plus a moderate queue workload needs 2 GB RAM at the floor. 4 GB is the comfortable production target.
Hardware. For a personal list under 50K emails per month, a VPS with 2 vCPU, 4 GB RAM, and 120 GB NVMe storage is sufficient. Growing lists at 200K+ per month need 4 vCPU and 8 GB RAM. We run this Compose setup on a 4 GB VPS in Frankfurt. Pick a location close to your subscribers if you can. Sending latency does not matter much; admin-panel responsiveness does.
Domain. A domain pointed at your VPS via an A record. Use a subdomain for the admin interface, for example mail.example.com. Sending domain and admin subdomain can be the same root domain.
SMTP relay account. Do not create one yet. The relay choice is the most consequential decision in this guide and it depends on your volume. Skip ahead to the "Choosing Your SMTP Relay" section, pick a provider, then come back here with the SMTP host, port, username, and password in hand.
Software on the VPS. Ubuntu 22.04 LTS or 24.04 LTS. Docker Engine 24.0 or higher with the Docker Compose plugin. UFW or equivalent firewall with ports 22, 80, and 443 open. SSH access as a non-root sudo user.
Deploy Listmonk With Docker Compose
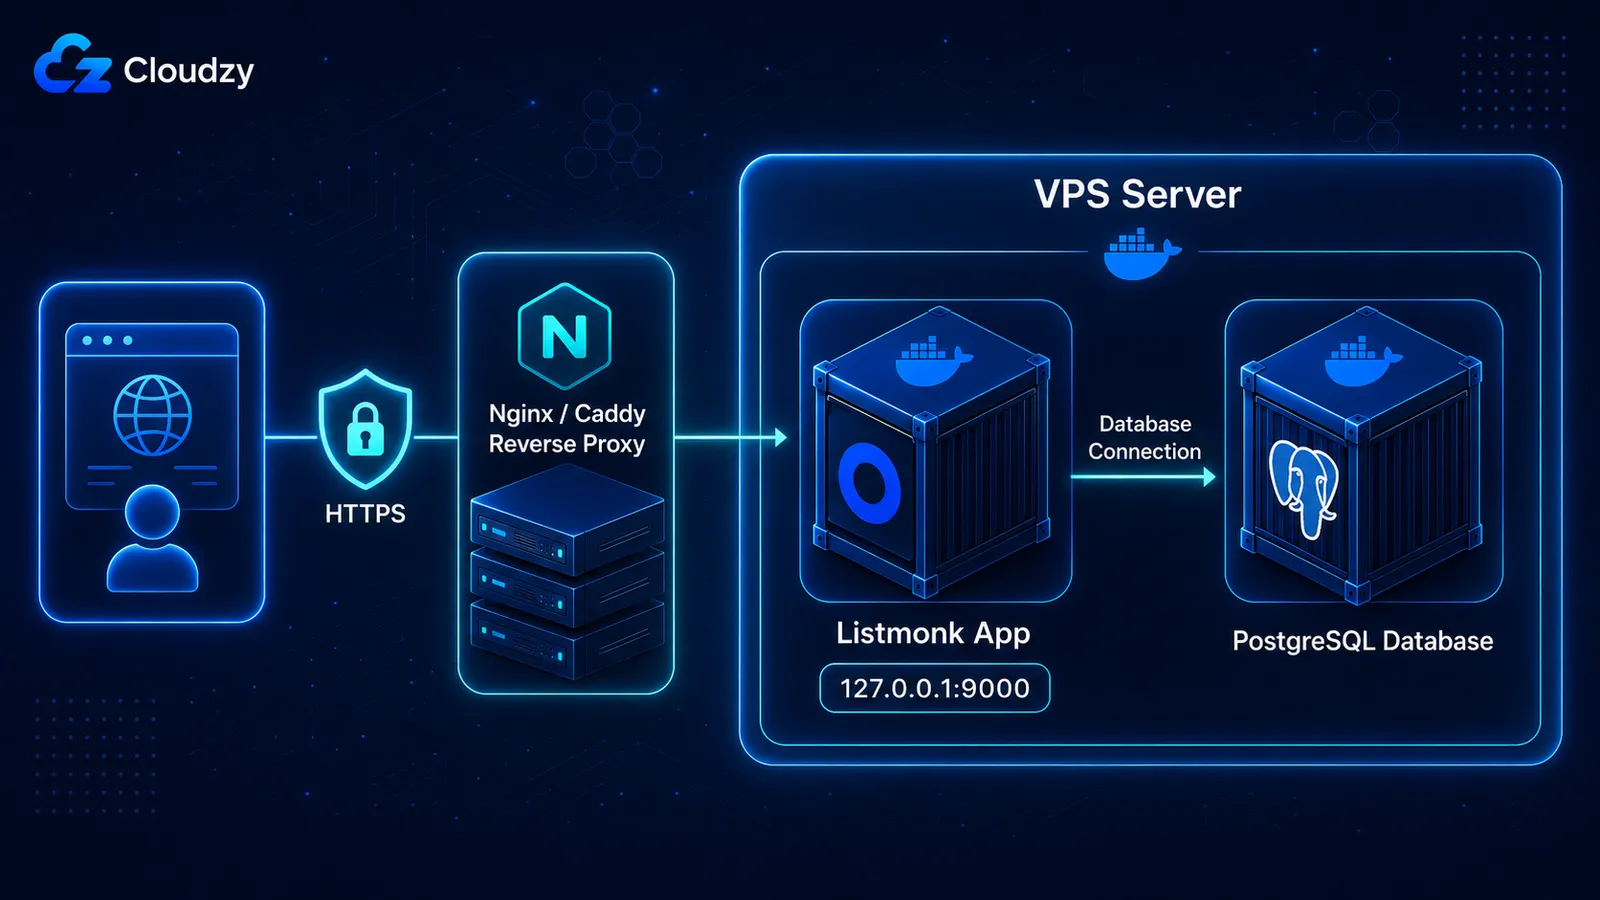
Create a directory for the deployment, then drop a docker-compose.yml file with two services: postgres for the database and listmonk for the application. Both restart on failure. Listmonk binds to 127.0.0.1 so the reverse proxy is the only thing that can reach it.
The Docker Compose File
Here is the docker-compose.yml. Verify the exact image tags and environment variable names against the official Listmonk installation docs. They update with each release.
# docker-compose.yml
services:
  postgres:
    image: postgres:16-alpine
    container_name: listmonk-postgres
    restart: unless-stopped
    environment:
      POSTGRES_USER: listmonk
      POSTGRES_PASSWORD: ${POSTGRES_PASSWORD}
      POSTGRES_DB: listmonk
    volumes:
      - listmonk-postgres:/var/lib/postgresql/data
    healthcheck:
      test: ["CMD-SHELL", "pg_isready -U listmonk"]
      interval: 10s
      timeout: 5s
      retries: 6

  app:
    image: listmonk/listmonk:latest
    container_name: listmonk-app
    restart: unless-stopped
    # Bind to loopback only. The reverse proxy is the public entrypoint.
    ports:
      - "127.0.0.1:9000:9000"
    depends_on:
      postgres:
        condition: service_healthy
    environment:
      LISTMONK_app__address: "0.0.0.0:9000"
      LISTMONK_db__host: postgres
      LISTMONK_db__port: 5432
      LISTMONK_db__user: listmonk
      LISTMONK_db__password: ${POSTGRES_PASSWORD}
      LISTMONK_db__database: listmonk

volumes:
  listmonk-postgres:
Create a .env file with POSTGRES_PASSWORD= set to a long random string. Then start the stack and run the one-time database install:
# Pull images and start the database first
docker compose up -d postgres

# Run the install step (creates schema and the first admin user)
docker compose run --rm app ./listmonk --install --idempotent --yes

# Start the application
docker compose up -d
The --install command prompts for an admin email and password. Save them. Verify both containers are running:
docker compose ps
Expected output: two services listed, both with Up status. The postgres row should show (healthy).
The 127.0.0.1:9000 binding is deliberate. Listmonk has no built-in authentication rate limiter and no IP allowlisting. Exposing port 9000 to the public internet means anyone on the planet can hit your admin login. The reverse proxy is what makes that login reachable over HTTPS only.
Nginx Reverse Proxy and SSL
Install Nginx and Certbot from the Ubuntu repositories. Create a site config at /etc/nginx/sites-available/listmonk with the proxy headers Listmonk needs to generate correct campaign links:
# /etc/nginx/sites-available/listmonk
server {
    listen 80;
    server_name mail.example.com;

    location / {
        proxy_pass http://127.0.0.1:9000;
        proxy_set_header Host $host;
        proxy_set_header X-Real-IP $remote_addr;
        proxy_set_header X-Forwarded-For $proxy_add_x_forwarded_for;
        proxy_set_header X-Forwarded-Proto $scheme;

        # Listmonk streams campaign progress over WebSocket
        proxy_http_version 1.1;
        proxy_set_header Upgrade $http_upgrade;
        proxy_set_header Connection "upgrade";
    }
}
Symlink it into sites-enabled, test the config, reload Nginx, then issue a certificate:
sudo ln -s /etc/nginx/sites-available/listmonk /etc/nginx/sites-enabled/
sudo nginx -t
sudo systemctl reload nginx
sudo certbot --nginx -d mail.example.com
Certbot rewrites the server block to listen on 443 with the new certificate and adds an HTTP-to-HTTPS redirect. Verify:
curl -I https://mail.example.com
Expected output: HTTP/2 200 with a valid strict-transport-security header. If you get a redirect loop, check that the X-Forwarded-Proto header is set in the Nginx config above. Nine times out of ten, the loop is that header.
If Listmonk is the only thing on this VPS, use Caddy instead. The Caddyfile is three lines and it handles certificate renewal without a cron job:
mail.example.com {
    reverse_proxy 127.0.0.1:9000
}
Fix the Message-ID Header
By default, Listmonk uses the system hostname in the outgoing Message-ID header. If your VPS hostname is localhost or anything that is not a valid FQDN, Listmonk sends Message-ID: <[email protected]>. Spam filters at Gmail and Outlook flag this immediately. This is documented in Cloudron Forum thread 15410.
The fix is one line in Listmonk's config.toml. For a fresh install, generate the file via docker compose run --rm app ./listmonk --new-config. Then set:
[app]
hostname = "mail.example.com"
Restart the app container after editing:
docker compose restart app
Do this before you send a single campaign. A list contaminated with localhost.localdomain Message-IDs is harder to recover than one that started clean.
Pro Tip
If you would prefer to skip the Compose setup, check out our one-click Listmonk VPS to deploy Listmonk in a few minutes with one click. The instance comes pre-configured with PostgreSQL. You still need to configure your SMTP relay and add your DNS records. Those steps are not optional regardless of how you deploy.
Choosing Your SMTP Relay

All sending happens through a relay you configure. The relay's IP reputation, rate limits, and bounce handling are what determine whether your email lands in the inbox or the spam folder.
Here is the functional comparison. Pricing and free tier limits change. Verify each on the provider's official pricing page before committing.
| Provider | Cost structure | Bounce webhooks | Best for |
|---|---|---|---|
| Amazon SES | Per-email, very low at volume | Yes, via SNS | Cost at volume; already on AWS |
| Postmark | Monthly base plus per-email | Yes, native | Deliverability-first; transactional reputation |
| Brevo | Free tier for low volume, paid tiers above | Yes | Low volume with upgrade path |
| Mailgun | Per-email pricing | No native webhook endpoint; use the generic bounce API if needed. | Familiar to devs |
That was just a brief look at each SMTP relay. Now, we will cover each in depth.
Amazon SES (Recommended Starting Point)
SES is the cheapest option at volume and the most discussed in the Listmonk community. The setup has more steps than Postmark or Brevo but the per-email cost difference is large enough at any real volume to justify the work.
Set it up in three stages. First, create an IAM user with the AmazonSESFullAccess policy (or a tighter custom policy with only ses:SendRawEmail and ses:GetSendQuota). Second, verify your sending domain in the SES console. SES walks you through the DKIM CNAMEs to add. Third, generate SMTP credentials from the SES SMTP settings panel. These are not your AWS access keys; SES generates a separate SMTP-specific username and password when you click "Create SMTP credentials."
In Listmonk's admin under Settings → SMTP, add a new server with:
- Host:
email-smtp.<region>.amazonaws.com(use the SES region you verified the domain in) - Port: 587
- Auth protocol: LOGIN
- TLS: STARTTLS
- Username and password: the SMTP credentials SES generated
SES requires STARTTLS on port 587. If you leave TLS set to none or pick port 465, Listmonk connects, SES returns 530 Must issue a STARTTLS command first, and the SMTP credential test in the admin panel may still show success. Send a real test email to a personal inbox you control before running any campaign.
New SES accounts start in sandbox mode. In sandbox you can only send to verified email addresses, which is not useful for a subscriber list. Open a support ticket from the SES console to request production access. Approval typically takes one business day.
Postmark (Deliverability-First Alternative)
Postmark costs more per email than SES but has native bounce webhook support and a reputation for high inbox rates with strict sender policies. Worth it if your newsletters are business-critical or you do not want to manage SES sandbox-to-production approval.
The Listmonk configuration is the same shape as SES: host, port 587, STARTTLS, credentials from the Postmark server's API tokens panel. Verify your sending domain in Postmark's signature setup, add the DKIM records Postmark generates, and you are ready to send.
Choose Postmark when deliverability matters more than per-email cost. Choose SES when volume matters more than handholding.
A warning about the SMTP credential test. The connection test in Listmonk's admin always reports success, even with invalid credentials. This is documented in a few GitHub issues. Do not trust it. After configuring any relay, send a campaign to a single test subscriber and confirm receipt in the target inbox before sending to your full list.
Avoid Mailersend for bulk campaign sending. Its 5-emails-per-connection cap produces 421 Service not available errors that Listmonk records as sent even though delivery failed. The campaign looks successful in Listmonk and drops most of its messages without warning.
Making Email Actually Land: SPF, DKIM, and DMARC
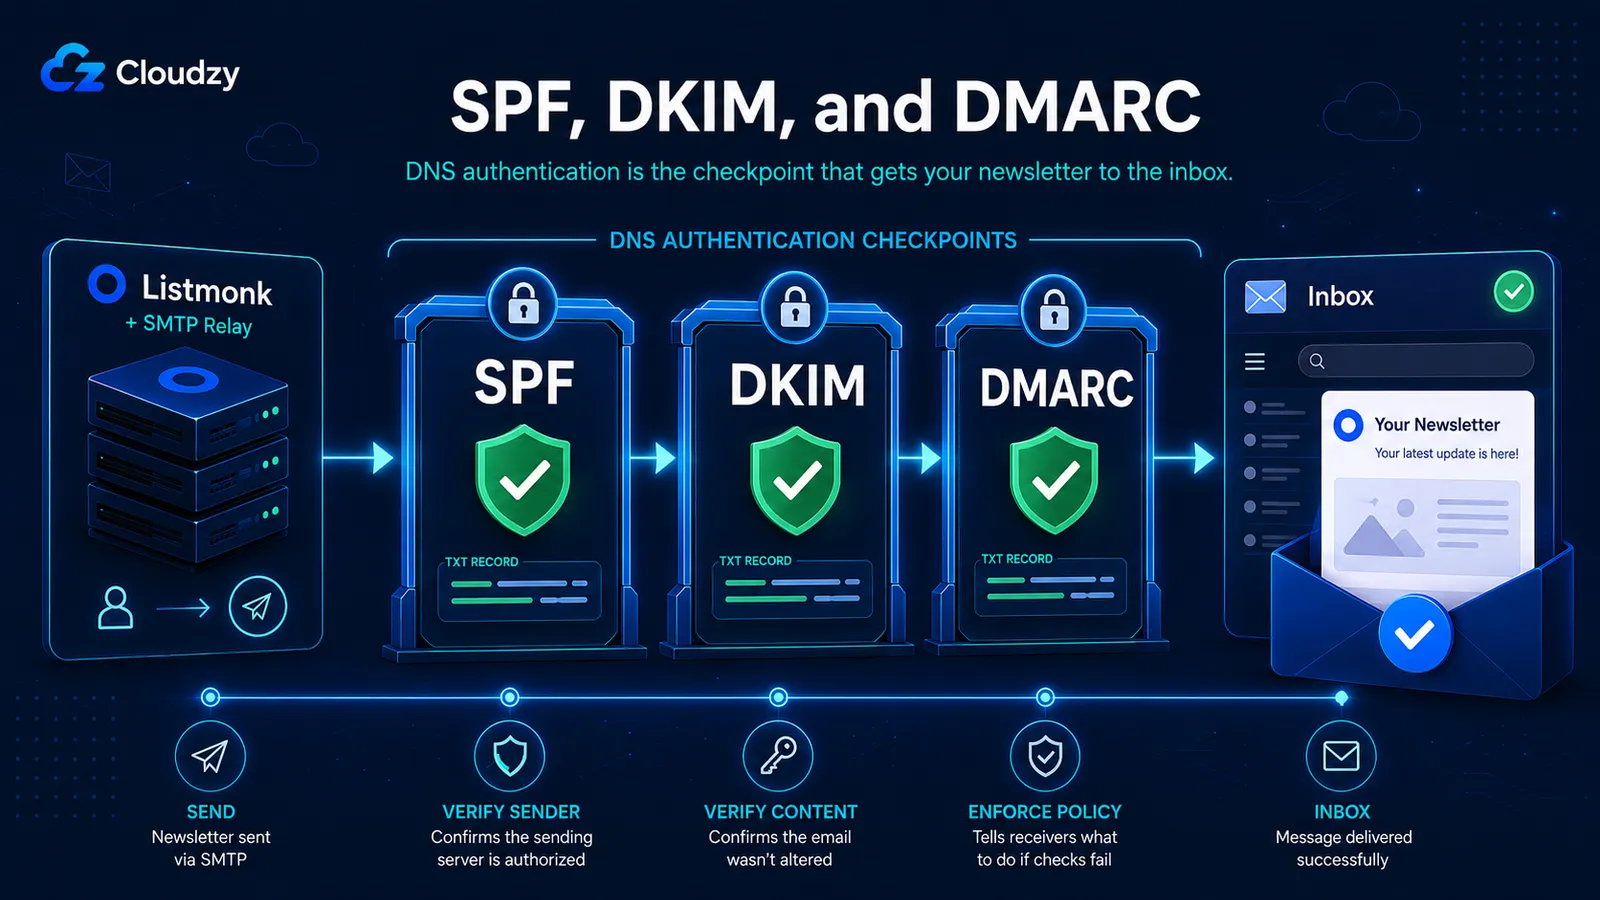
These are three DNS records on your sending domain that tell receiving mail servers your domain authorized this relay to send on your behalf. Skip any one of them and a meaningful portion of your sends will hit spam at scale, no matter how clean your relay or your copy. Add them at your DNS provider before sending the first campaign.
SPF Record
SPF authorizes specific IPs or sending services to send email for your domain. Add a single TXT record at the root of your sending domain with the include for your relay. For SES the record looks like:
v=spf1 include:amazonses.com ~all
For Postmark, replace the include with include:spf.mtasv.net. Always check your relay's official SPF documentation for the exact include value. It changes by provider and sometimes by region.
A domain can only have one SPF record. If you already have one for another service (Google Workspace, Microsoft 365), merge the include into the existing record instead of adding a second one.
DKIM
DKIM attaches a cryptographic signature to outgoing emails that receiving servers verify against a public key in your DNS. Your relay generates the keypair. You add the public key as a TXT record at a selector subdomain (for example, sel1._domainkey.example.com) with the exact value the relay gives you.
Listmonk does not handle DKIM signing. The relay does. There is no Listmonk-specific DKIM configuration. Follow your relay's DKIM setup wizard, add the records it gives you, and wait for DNS propagation (usually under 30 minutes; sometimes a few hours).
DMARC
DMARC tells receiving servers what to do with email that fails SPF or DKIM checks. Start in monitoring mode with p=none so you can see failures in the aggregate reports without affecting deliverability while you iron out misconfigurations. Add a TXT record at _dmarc.example.com:
v=DMARC1; p=none; rua=mailto:[email protected]
After two or three weeks of clean reports, tighten the policy to p=quarantine or p=reject. Do not skip the monitoring phase. A typo in your SPF include combined with p=reject on day one will wipe out your own legitimate email with no signal that anything went wrong.
The List-Unsubscribe header (RFC 8058) is generated automatically by Listmonk. Confirm it is enabled under Settings → General. Gmail and Apple Mail surface this header as a one-click unsubscribe option, which protects sender reputation.
What Actually Breaks in Production
Four failure modes that do not show up until you send your first real campaign. Catch them before your subscribers do.
Problem 1: Bounce rate does not match your relay's number. Listmonk processes bounces by reading a designated bounce email address over POP3 and deleting every message it reads. That includes vacation replies, delivery receipts, and out-of-office notifications, all classified as bounces. Your relay only counts genuine delivery failures returned by recipient mail servers. If SES reports 0.6% and Listmonk reports 4%, this is the gap. The fix is to configure bounce webhook callbacks instead of POP3. For SES, use SNS to deliver bounce notifications to Listmonk's webhook endpoint. For Postmark, point its native webhook at the same endpoint. Webhook bounces are accurate; POP3 bounces inflate.
Problem 2: The SMTP credential test says success when it is wrong. As noted in the relay section, the connection test always reports success regardless of credential validity. Do not trust it. Always send a real test email after configuring or changing any SMTP setting.
Problem 3: A campaign stops mid-send with no error. Listmonk marks campaigns as Finished even when only 60% of subscribers received the email. The remaining sends were rejected by the relay or throttled at the VPS network layer, and Listmonk does not surface either as a campaign-level error (Cloudron Forum thread 13165). If a campaign shows fewer sends than subscribers, open your relay's dashboard for the send time window and compare the relay's accepted count against Listmonk's. The truth is in the relay.
Problem 4: Nobody is backing up PostgreSQL. The Compose volume persists data across restarts. It does not protect against host failure, accidental docker volume rm, or corrupted upgrades. Add a daily pg_dump:
0 2 * * * docker exec listmonk-postgres pg_dump -U listmonk listmonk > /backups/listmonk-$(date +\%Y\%m\%d).sql
Run the line once by hand first. Verify the output file is non-empty before you trust the cron entry. A backup script that writes a zero-byte file without raising an error is worse than no backup at all, because you stop thinking about it.
Before you trust any of this in production, send a test campaign to one subscriber and confirm receipt in the target inbox. If that one email lands cleanly, the next ten thousand will too.
Frequently Asked Questions
Why Are My Listmonk Bounce Rates Higher Than What Amazon SES Reports?
Listmonk's POP3 bounce processing inflates counts by reading out-of-office replies and vacation auto-responders as bounces. Configure SES SNS webhook callbacks for accurate counts.
Does Listmonk Support Transactional Emails?
Listmonk is a newsletter and broadcast campaign tool. It does not natively handle transactional email (password resets, order confirmations, one-to-one triggered emails). For transactional email from the same sending domain, configure your relay's transactional endpoint separately or use a dedicated tool like Postal or Postmark's transactional API alongside Listmonk.
How Do I Import My Mailchimp Subscribers Into Listmonk?
Export your Mailchimp list as a CSV from Audience → Export Audience. In Listmonk, go to Subscribers → Import and upload the CSV. Map the email and name columns when prompted. Listmonk accepts standard CSV exports from Mailchimp, ConvertKit, and most newsletter platforms without format conversion.
What Happens When Someone Unsubscribes From a Listmonk Campaign?
Listmonk adds an unsubscribe link to every campaign email by default. When a subscriber clicks it, they are added to the blocklist and removed from all future campaigns. The List-Unsubscribe header (RFC 8058) is included automatically, so mail clients that support one-click unsubscribe (Gmail, Apple Mail) surface it natively. The subscriber record stays in the database for audit purposes but no further campaigns will be sent to them.